High Pressure Bolt Tightening Operation, Step By Step
In this article, you will learn about the steps for tightening high-pressure bolts. After calculating the torque of the flange gasket bolts in detail, use a hydraulic wrench to tighten the bolts. Final QA. The whole process is simple and efficient.
Now, let’s get started.
1. Installation of flange gasket bolts and calculation of torque
(1) Install the flange bolts and gaskets that have been inspected in good condition according to the construction drawings, and install them according to the design conditions in the pipeline:
When the design temperature of the pipeline is ≥400°C, the threaded part of the bolt should be coated with a high-temperature anti-seizure agent.
When the design temperature of the pipeline is < 400°C, apply molybdenum disulfide to the threaded part of the bolt.
(2) Calculation of bolt torque value
Tightening torque when tightening the bolts:
M=KtQ0d x 10-3Nm
In the formula: Q0——- pre-tightening force, N.
Kt——Tightening force coefficient.
d———The nominal diameter of the bolt, mm.
The coefficient Kt is related to the smoothness of the thread surface and flange, lubrication condition, tightening speed, tightening tools used, temperature changes during repeated tightening, etc. It usually varies between 0.1 – 0.3 (the empirical value is 0.2).
Preload Q0 = σ0 x As
As———-The effective cross-sectional area of the bolt at the thread.
As=π x ds2/4
ds————-The calculated diameter of the dangerous section of the threaded part.
ds=(d2 +d3)/2 x d3 = d1 – H/6H ———-Nominal working height of thread teeth.
σ0 = σtσt———the allowable stress of the bolt material at 20°C.
Example: M20 bolts, grade 8.8.
M= Kt x σt x As x d x 10-3
=0.19 x219 x245 x20 x 10-3
=204Nm
(3) If the bolt manufacturer specifies the torque value, follow the specified torque.
If there is no specified torque requirement, you can also refer to the recommended maximum torque value table for bolts and nuts to inquire about and calculate the required torque.
(Note: The bolt loosening torque is 1.5~2.5 times the tightening torque.)
(4) Wrench pump pressure and torque value conversion
After determining the torque, check the “Pressure Torque Comparison Table” according to the model of the hydraulic wrench used. The torque value needs to correspond to the pressure set by the wrench pump station.
2. Use a hydraulic wrench to tighten the high-pressure bolts
2.1 Inspection of hydraulic torque wrench
(1) Whether the pump station, high-pressure hose, working head (including reaction arm) sleeve, and other components are complete.
(2) The power supply required by the electric wrench pumping station is 220V 50Hz, ensure good grounding and avoid electric shock.
(3) Check whether the power supply of the wrench pump station is intact: the power cord is not exposed, and the plug is intact.
Check the pressure gauge: the dial is filled with silicone oil, if there is oil leakage, it cannot be used.
Check the oil volume of the wrench pump station: According to the fuel tank scale, the fuel tank is full of hydraulic oil. If the amount of oil is insufficient, cannot start the pump station.
The surface of the oil pipe is not damaged, the quick connector is intact, and the length of the oil pipe meets the needs of on-site use.
The socket size must be correctly matched to the nut and should completely cover the nut. (Note: If the bolt is too long, you need to replace the extension sleeve.)
2.2 Activating the hydraulic torque wrench
(1) Connection of hydraulic wrench
The connection sequence is: hydraulic pump station → high-pressure oil pipe → hydraulic wrench working head → adapter set. (Note: Do not use tools such as wrenches to tighten the threaded sleeve, which will cause thread deformation.)
(2) Start the test
Turn on the power supply (220V), press the “start button” on the remote control, and the pump will start. Press the “start button” again to stop the pump. After starting several times in this way, the hydraulic oil can be filled with each valve block in the system to ensure the smooth flow of the oil circuit.
(3) Pressure setting
Start the hydraulic pump station, adjust the working pressure of the pump according to the bolt torque value, hold down the “work key” button of the remote control with one hand, and at the same time turn the pressure regulating valve clockwise with the other hand to increase the pressure. At this time, observe the pressure rise through the pressure gauge, rise to the required pressure, tighten the butterfly valve under the pressure regulating valve, and lock the pressure. (Note: The pressure of the pump can only be adjusted from low pressure to high pressure.)
(4) Test before tightening the bolts
Press and hold the “work button” on the remote control, and the system will feed oil, and you can see that the driving square drive of the working head starts to rotate. When you hear a “snap” sound from the working head, the driving side drive will stop rotating. Release the “working key” at this time, and the system will return oil. When you hear the “pop” sound of the working head again, it means that the working head has been reset and continues to work. According to the above method, make the driving side drive run several times, and if there is no abnormality, you can put the working head on the bolt and start working.
(5) Adjust the driving square drive
Change the installation direction of the drive shaft to adapt to tightening or loosening the bolts. The lower drive can be removed by pressing the button of the locking device.
2.3 Hydraulic wrench in control work
(1) Bolt tightening
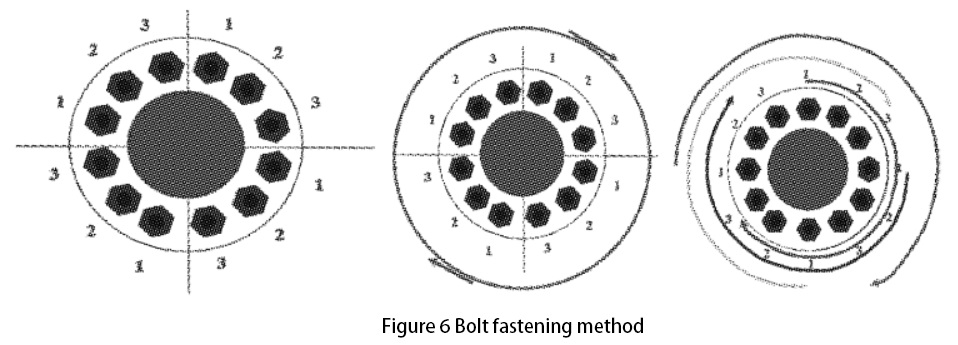
Before the bolts are tightened, the construction personnel write the fastening serial number on the bolts (Figure 6(1)), and the symmetrical method is used during the fastening process. When the site construction conditions permit, adopt the two-synchronization or four-synchronization method for fastening. During the fastening process, the bolts are fastened three times, which are 75% and 100% of the calculated torque value respectively.
For example:
The two synchronous fastening methods are shown in Figure 6(1):
In the first round of two simultaneous fastenings, each operator first tightened four No. 1 bolts diagonally with 75% torque value and then tightened the remaining bolts clockwise. The last two tightening methods are the same as above, and the tightening torque is 100% of the given torque.
The four synchronous fastening methods are shown in Figure 6(3):
Four simultaneous operators each tighten three-quarters of the entire flange bolts in three tightening passes. That is, 1-2-3-1-2-3-1-2-3, so that the work trajectories of all personnel overlap by half a circle, thereby reducing the difference in preload force. Maximum balance of uneven torque caused by differences in machines and personnel.
After the working head, sleeve, and nut are connected, adjust the reaction arm to find a reliable fulcrum. After the working head is fixed, press the “Working Key” button on the remote control repeatedly to tighten the nut until it does not tighten.
After the fastening is completed, randomly select 2 bolts for inspection. Use a hydraulic wrench to tighten the bolts under the calculated torque value, if the bolts do not move, it is qualified.
(2) Pressure relief shutdown
After the work is over, press the “Working Key” button of the remote control with one hand, release the butterfly valve with the other hand, and then turn the pressure regulating valve counterclockwise until the pointer of the pressure gauge indicates that the pressure is almost zero, and the pressure relief is completed.
Release the “Working Key” button, and then press the “Start/Stop Key” to turn off the pumping station. (Note: After each work, please discharge the system pressure to zero, and then put it in the warehouse for storage, so as to avoid the failure of the spring of the pressure regulating valve caused by long-term pressure.)
After shutting down, remove the oil pipe, clean the working head, pump station, oil pipe, and casing, check whether there are missing accessories (drive square drive, handle, etc.), put them in a special packing box, and put them in the warehouse for storage.
3. Quality Check
After the high-pressure bolts are fastened, check and confirm in time, and fill in relevant records.
In the end
The above is the whole process of using a hydraulic wrench to tighten the flange high-pressure bolts. By tightening the bolts through the above methods, each bolt is evenly received, the torque is accurate, and the torque repeatability is about ±3%. Flanges and gaskets are evenly stressed, and the sealing effect is good.
TorcStark specializes in providing bolting solutions. If you have any questions, please contact us, our engineers are happy to help you solve various bolt fastening and disassembly problems.